Rebels unite this Halloween season with the ultimate duo from Star Wars: The Last Jedi. Thanks to StarWars.com we can all have these adorable decorations at houses this season.

Here is what StarWars.com says you will need for this process:
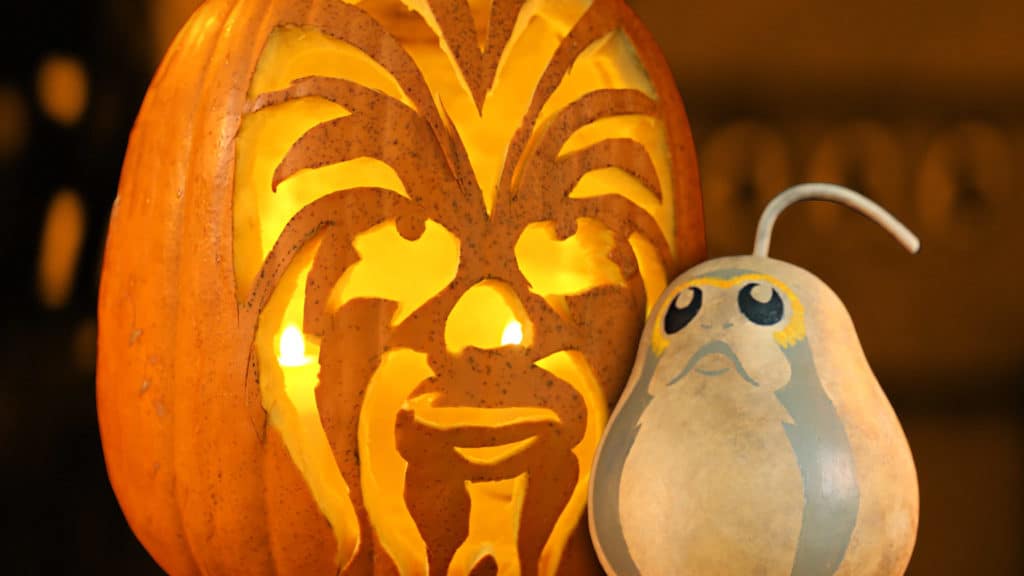
- A pumpkin (Look for one that is taller than it is wide, so there is room for all of Chewie’s features.)
- A gourd (There are many shapes and sizes of gourds. Some are smooth, and some are bumpy. We found the perfect gourd for a porg by doing an online search for a “clean round gourd.” Check your local crafts store! NOTE: In a pinch, you can simply use a smaller pumpkin. But a porg gourd just makes much more sense to us.)
- Pumpkin carving kit
- Baby carrots (a.k.a. porg toes)
- Hobby knife, if desired, for more precise carving
- Carbon paper, if desired
- Chewbacc-O’-Lantern stencil
- Porg stencil: Choose from happy porg, chill porg, angry porg, or sleepy porg!
- Acrylic (or other type) paints: White, black, brown, gray, yellow, and orange are suggested
- Paint brushes
- Toothpicks
- Tea light candles (battery-operated)
For a no obligation, FREE Quote with new bookings contact our sponsor Magical Vacation Planner by calling: 1(407)442-0289
Or for a free no obligation quote with new bookings you can fill out the form by Clicking HERE!
Now that. you have the materials, follow these directions get your Chewie-Porge adorableness ready.
Directions For Chewie:
Step 1: Cut your top hole in the pumpkin, and remove the strings and seeds. Then, use a scraping tool to thin the inside walls. NOTE: Make sure your top hole is the right size to nestle your “porg gourd” in.
Step 2: Print out the Chewbacc-O’-Lantern stencil from the StarWars.com website. NOTE: Depending on the size pumpkin you have, you may need to reduce or enlarge the print size and paper. Look for the “scale” and “paper” settings in your printer dialog and adjust until the stencil prints out at just the right size for your pumpkin.

Step 3: Tape the Chewie stencil in place on your pumpkin. Use the poker tool found in most pumpkin carving kits to score the design onto the pumpkin. Alternatively, you can cut out the black parts of the Chewie stencil and then use a water-based marker to trace the design onto your pumpkin.

Step 4: Carefully use your hobby knife or other pumpkin carving tool to carve the Chewie design into your pumpkin.
Directions for Porg
Step 1: Print out your desired porg stencil.NOTE: As with the pumpkin stencil, you may need to reduce or enlarge the print size and paper. Look for the “Scale” and “paper” settings in your printer dialog and adjust until the stencil prints out at just the right size for your gourd.

Step 2: Using carbon paper, trace the porg stencil on your gourd.

Step 3: Paint your porg gourd! This part is entirely up to you. See above for what we did.
Step 4: It’s time to introduce your porg to Chewie. Nestle your porg in the top hole of your Chewie pumpkin. We’ll give the little guy some feet next.

Step 5: Using your baby carrots and toothpicks, affix your porg toes on Chewie’s forehead.

Final Step: Place your battery-powered votive lights inside and dim the lights! Chewie and his porg friend are now ready for your front porch, steps, or a ride in the Falcon.

