News

Adorable DIY Winnie the Pooh–Inspired Wall Hanging

There are many words to describe Winnie the Pooh. He is positive, friendly, cheerful, and as sweet as hunny. DisneyFamily shares a DIY that will bring Pooh’s bright energy into your home decor. This DIY macramé wall hanging, inspired by our favorite silly ol’ bear, is easy to put together and will hopefully make you smile every time you see it. Keep reading to learn how to make this jolly craft!


What You’ll Need:

  • ½ to ¾–inch rope
  • Floral wire
  • Hot glue gun
  • Black felt
  • Yellow felt
  • Red yarn
  • Yellow yarn
  • Masking tape
  • Scissors

How To Make It

Scissors, red and yellow yarn, blue tape, felt, wire, glue gun, glue sticks, and white rope displayed on a white background—these are classic Disney Parks crafting essentials for fans looking to make Winnie the Pooh-themed wall hangings or magical decor inspired by the Hundred Acre Wood.

1. Form a half circle with the rope by arching the rope back and forth. The rope should loop between each arch at the bottom of the semi-circle.

For a no obligation, FREE Quote with new bookings contact our sponsor Magical Vacation Planner by calling: 1(407)442-0289 Or for a free no obligation quote with new bookings you can fill out the form by Clicking HERE!


A white rope coiled in a wavy pattern on a white display table, with blue tape near one end—ideal for creating a subtle Winnie the Pooh-inspired accent in your Disney-themed room or as part of an interactive craft station at Magic Kingdom’s Hundred Acre Wood experience.

2. Cut the rope on the loops between each arch. Add masking tape to the ends to keep the rope from unwinding prematurely.

Eight white ropes with blue-taped ends form a playful arch on a white surface, creating an inviting backdrop ideal for crafting imaginative Winnie the Pooh-themed décor—perfect inspiration for Disney Parks enthusiasts looking to bring that magical Hundred Acre Wood charm into their own space.

3. Cut pieces of floral wire to match the length between the taped ends of each piece of rope. Arch the wire pieces to match the ropes’ arches. This is to hold the arches’ shapes.

Crafting magic awaits with lengths of rope wrapped in blue tape and a blue hot glue gun arranged on a pristine white tabletop—these are just the right props for fans wanting to bring Winnie the Pooh’s charm home after a whimsical day at Disney Parks.

4. Use the hot glue gun to glue down the wire to the rope.

A coiled white braided rope with its ends secured in blue tape and red yarn, and a loose strand of red yarn beside it—adding an authentic storybook detail perfect for recreating beloved Winnie the Pooh moments in Disney parks or themed entertainment spaces.

5. Now it’s time to wrap the yarn around the rope! With the red yarn, start at one end and tie a knot. Wrap the red yarn tightly around the rope to not leave any gaps. Keep wrapping until you are about ¼ of the way up the semi-circle. Tie a knot and cut the tail. Repeat on the other end of the rope.

6. Continue to wrap red yarn on the ends of the rope, stopping when the red yarn hits ¼ up the semi-circle. It helps to keep the ropes in the semi-circle form to reference so you know when to stop wrapping.

A vibrant half-circle wall hanging featuring concentric bands of yellow, red, and blue yarn, reminiscent of classic Winnie the Pooh colors, displayed against a white backdrop—an imaginative craft that would be right at home in a Winnie the Pooh attraction or themed entertainment space.

7. Once all the ropes have red ends, wrap the yellow yarn around the rest of the ropes.

8. After each arch is fully wrapped, remove the masking tape and unravel the rope.

9. In the middle of the top arch, tie a loop with yellow yarn. This will be what hangs the piece to the wall.

10. Form the semi-circle again and hot glue the ropes together.

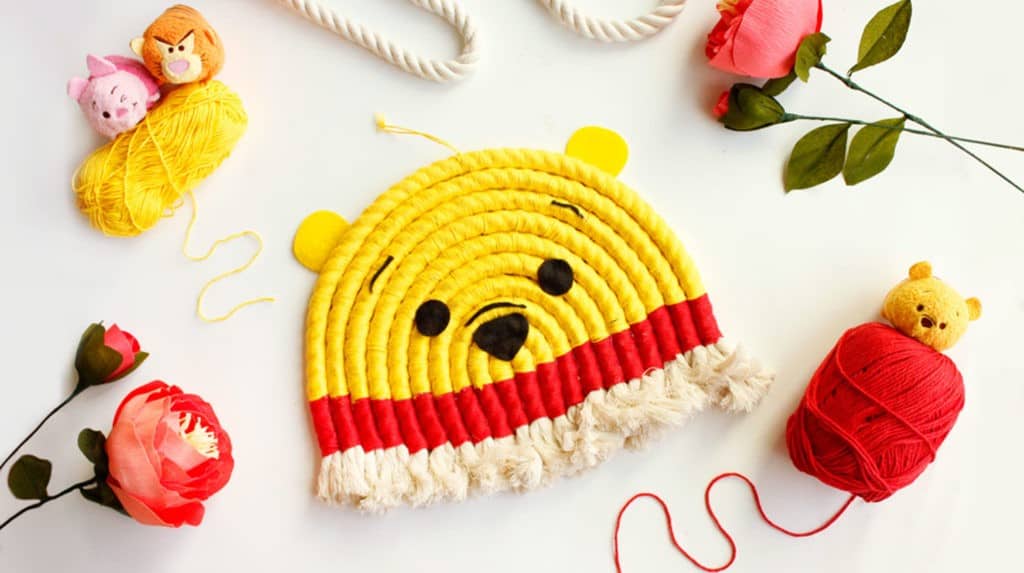
A Winnie the Pooh-inspired yarn craft featuring his iconic bear face in yellow and red, with black details and white fringed edges, bringing a touch of Hundred Acre Wood charm to any Disney-themed room or amusement park event décor.

11. Cut out shapes for Pooh’s eyes and nose out of black felt. Cut out shapes for Pooh’s ears out of yellow felt. Glue those onto the semi-circle.

Winnie the Pooh themed wall art, tsum tsum plush collectibles, whimsical pencils, and cheerful flowers are arranged on a crisp white table against a matching backdrop—bringing the magic of the Hundred Acre Wood to your Disney-inspired room. This charming vignette is perfect for fans looking to capture that classic storybook atmosphere, whether as playful wall décor or as part of your very own home celebration reminiscent of experiences at Disney Parks.

12. Hang on your favorite wall. You’re done!

Notes: All cutting and hot gluing should be done by an adult.

Source: DisneyFamily

Jamie Sylvester

I'm a Disney nerd! A kid at heart who loves the magic and memories of Walt Disney World. I follow all things Disney and enjoy the vacations, day trips, weekend getaways, and geek out over the planning of such events. My goal is to experience as many Disney desserts and cocktails as possible! Married to another Disney nerd and blessed with a daughter and son, we thoroughly enjoy the magic at Disney and are here to help others experience the magic as well.

Related Articles