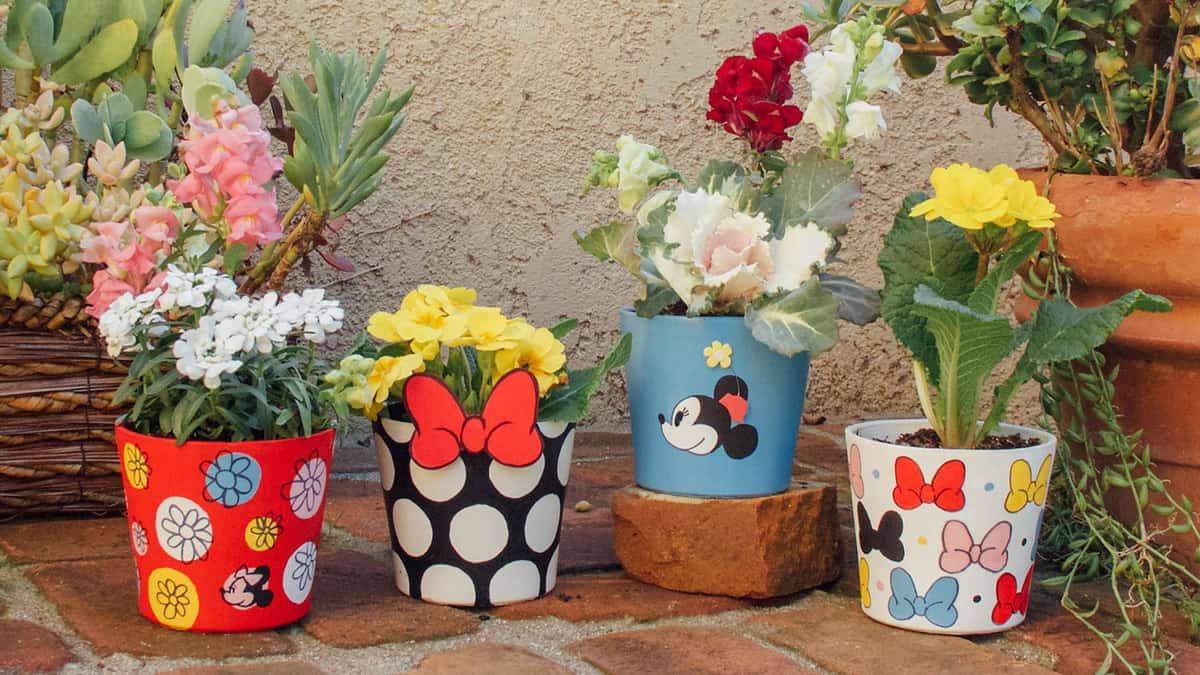
She’s the sweetest, the cutest, and knows how to show off those polka dots! Yep! It’s Minnie Mouse of course! What better way to bring a little color and excitement to your garden than with Minnie Mouse. Get ready for a little DIY that will go a long way to bring brightness to your garden. Just follow the steps below from Family.Disney.com:
[google_ad]

What You’ll Need
- Terra-cotta flower pot
- White, red, yellow, black, light blue, blue, black, and pink acrylic paint
- Paintbrushes
- Black felt-tip pen
- Decoupage glue
- Red and yellow craft foam
- White paper
- Hole punch
- Scissors
- Jewelry wire
- Hot glue
- Pencil
How To Make It
1. Use a rag to dust off the terra-cotta pot. Paint the pot with a coat of white paint. Let dry completely.
[google_ad_btf]

2. To create the light blue flower pot, add a coat of light blue paint. Let dry completely. Next, add Minnie’s profile. You can use a small paintbrush or a black felt-tip pen to add details. Seal the flower pot with a layer of decoupage glue. To make Minnie’s hat, cut out a hat shape from red craft foam. Cut out a small flower from yellow foam. Use the hole punch to punch out one white dot. Cut a short piece of jewelry wire. Glue the white dot to the inside of the flower, then one end of the wire to the back of the flower. Glue the other end to the back of the hat. Glue the hat and flower onto Minnie’s profile.

3. To create the bow pattern flower pot, add a second coat of white paint. Let dry completely. Lightly sketch out a pattern of bows around the pot. You can cut a bow shape from cardstock to use as a template if you’d like each bow to be identical in size. Paint the bows different colors, alternating between black, blue, pink, yellow, and red. You can also add little dots of color in between the bows! Once dry, outline the bows with the black felt-tip pen, or use a thin paintbrush and black paint to carefully paint the outlines. Fill in the space around the dots with black paint. Once the paint is completely dry, seal with a layer of decoupage glue.

4. To create the polka dot flower pot, add a second coat of white paint. Let dry completely. Draw a polka dot pattern all over the pot with pencil. You can cut a circle from cardstock to use as a template if you’d like the polka dots to be identical in size. Fill in the space around the dots with black paint. Once the paint is completely dry, seal with a layer of decoupage glue. Cut a bow shape from red craft foam. Use the black felt tip marker to create an edge outline and bow details. Hot glue the bow to the top of the pot.

5. To create the red flower pot, add a coat of red paint. Let dry completely. Use a pencil to draw polka dots in various sizes all over the flower pot. Paint the polka dots with yellow, white, blue, and pink paint. Let dry completely. Use a black permanent marker to draw daisies on each circle. On one circle, draw Minnie Mouse! Coat the entire flower pot with decoupage glue to seal your design.
6. Plant a flower into the pot, and voila!

Notes: All cutting and hot gluing should be done by an adult. Note: Some felt-tip pens will bleed when covered with decoupage glue. Be sure to test them out on the bottom of your flower pot before using on your design.
Source: Family.Disney.com