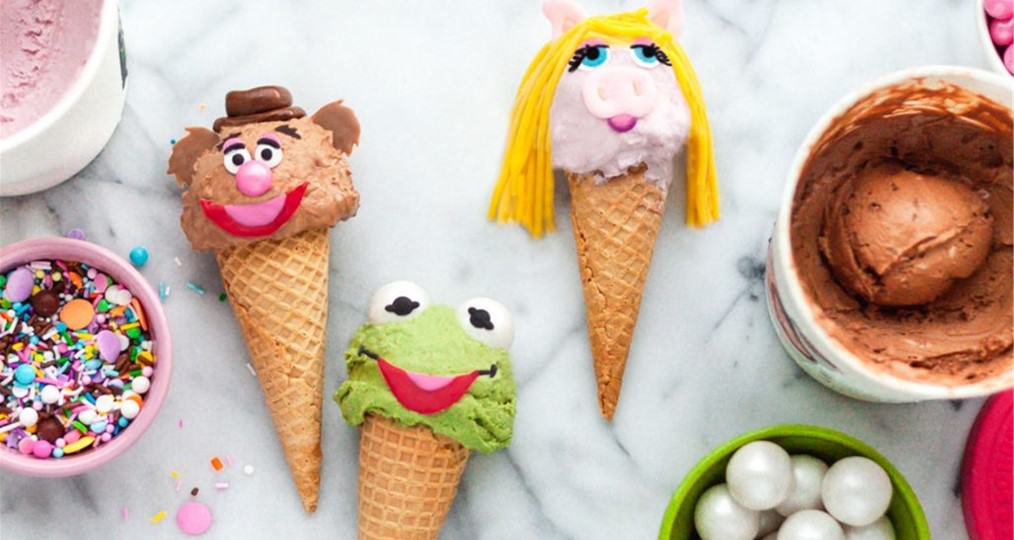
Hi-ho! Kermit the Frog and friends, here! Ready for a yummy ice cream treat? This no-churn recipe from DisneyFamily is super simple to create, dairy-free (but still crazily creamy), and so delicious! Grab a scoop, dress it up as your favorite Muppet using candy, and get ready to enjoy this special treat.
[google_ad]

How to Make the Most Delicious Ice Cream Inspired by The Muppets!
Ingredients:
- COCONUT WHIPPED CREAM
- 2 15-oz. cans coconut cream
- 2 teaspoons vanilla extract
- MISS PIGGY STRAWBERRY
- 7 oz. sweetened condensed coconut milk
- ½ lb. fresh strawberries, cut in half
- 1 teaspoon vanilla extract
- 1 cup coconut whipped cream
- 4 sugar cones
- 8 large sprinkle eyes with eyelashes
- Yellow pull ‘n’ peel licorice candy (I found this color in a strawberry-flavored variety pack)
- Pink, bright white, and blue candy melt wafers
- FROZZIE BEAR CHOCOLATE
- 7 oz. sweetened condensed coconut milk
- 2 tablespoons unsweetened cocoa powder
- 1 teaspoon vanilla extract
- 1 cup coconut whipped cream
- ¼ cup chocolate cereal (plus more for serving)
- 4 sugar cones
- 4 mini pink gumballs
- 8 standard-size sprinkle eyes
- 8 Tootsie Rolls
- Pink, red, and light cocoa candy melt wafers
- KERMIT MATCHA
- 7 oz. sweetened condensed coconut milk
- 1 ½ teaspoons matcha powder
- 1 teaspoon vanilla extract
- 1 cup coconut whipped cream
- 4 sugar cones
- 8 large white gumballs
- Black, pink, and red candy melt wafers
[google_ad_btf]
Helpful Tips:
- All cutting should be done by an adult (with adult supervision when using the blender).
- Refrigerate the coconut cream the night before using it. If the coconut whipped cream becomes too stiff, you can add a little of the liquid from the can of coconut cream. If it is too loose, try adding cornstarch or arrowroot flour, 1 Tbsp. at a time, until it reaches the right consistency (it will set more once chilled).
- If your Tootsie Rolls are hard to mold, you can soften them by heating for 2-5 seconds in the microwave.
- Store leftover coconut whipped cream in an airtight container in the refrigerator.
Directions:
1. Transfer the mixing bowl and whisk attachment of a stand or a handheld mixer to the freezer to chill for 15 minutes.
2. Scoop just the solid part from both cans of refrigerated coconut cream into your chilled mixing bowl (reserving the liquid in case you need it later). Beat on medium-high speed for 1 minute, then add the vanilla extract and beat again for 1 more minute or until smooth (being careful not over-mix or else the coconut cream may separate). If your whipped cream is too loose or too stiff, see the helpful tips above for suggestions.
3. Transfer the whipped coconut cream to the refrigerator (it will set more once chilled).
4. Time to turn it into ice cream! For each flavor, combine the condensed coconut milk, vanilla extract, and flavor mix (strawberries, matcha powder, or cocoa powder) in a blender until smooth and combined.
5. Transfer to a large mixing bowl, gently fold in ½ cup of the whipped cream, and then fold in the other half until completely mixed in.
6. Pour the mixture into an airtight, freezer-safe container and smooth the top with a spoon. For Fozzie Bear, stir in the ¼ cup of chocolate cereal. Cover and freeze overnight.

7. You can make all of the decorations in advance so they are ready to add to the ice cream once it’s set. To create Kermit, transfer the black, pink, and red candy wafers to microwave safe bowls, and microwave for 30 seconds each, at 50% power. Stir, and continue to microwave in 30-second intervals until smooth.

8. Use a toothpick dipped into the melted chocolate to draw Kermit’s mouth onto wax paper, using the image as a guide. You can also draw his pupils onto the gumballs (or create them separately and add when set with more melted chocolate). Set aside.

9. To make Fozzie Bear, unwrap 2 Tootsie Rolls and use your thumb and pointer finger to squish one into a flat square (for the top of his hat), and the other into a flat rectangle (for the brim of the hat). Use melted chocolate to connect the two pieces.

10. Melt the pink, red, and light cocoa candy wafers, like you did for Kermit. Using a toothpick, draw Fozzie’s mouth onto wax paper with the red and pink. Draw Fozzie’s ears and eyebrows with the light cocoa. Use a little of the pink to draw Fozzie’s eyelids onto the top of each candy sprinkle. Set aside.
11. To make Miss Piggy, melt the pink and white candy wafers together to create a light pink shade. Use this to draw her ears and snout onto wax paper. Add pink to the center of each ear. Use more melted pink to color in her eyelids on the sprinkles, and use the melted blue wafers to add color to her eyes. Set aside. Once you are ready to decorate the ice cream, unwrap the licorice and separate the yellow strands. Use kitchen scissors to cut varying lengths to give Miss Piggy bangs or any hairdo you would like.

12. Remove the ice cream from the freezer about 10-15 minutes before scooping and decorating. Add 1-2 scoops per cone, place the cone in a bowl, and add your candy decorations.
13. Enjoy!

Source: DisneyFamily